How to create a Technical Rider / Stage Plot
When you are preparing to perform in a show or a play one of the most important things that you must have with you is the Techrider. It is a document that will help the organizers of the show understand your requirements. They will make sure to provide you with all the facilities. In case that they are unable to meet your requirements, they will let you know. One of the biggest benefits of Techrider is that it will allow you to accommodate according to the situations. As well as it will allow you to check and finalize the setup of your stage so that you will not have to face any difficulties while performing on stage.
Although it's self-explaining to create your Technical Rider (or sometimes Stage Plot) with this free tool you can find some description below that explains exactly how to generate a Stage Plot with this generator.
- The Stage Plot
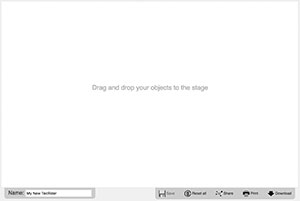 The stage is the white area on your browser that initially writes "drag and drop your objects to the stage". This symbolizes the true stage for your live concert and/or show from the audience perspective. Therefore, you can place objects on the stage and create your Technical Rider within just a few minutes.
- Add objects to the stage with Drag and Drop
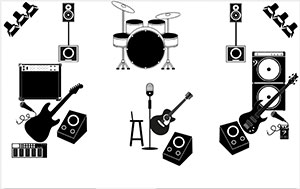 To add objects to your Stage Plot you simply need to choose the right category first and then drag and drop the icon of your choice to the stage. A common setup for a band could be two guitars with effect pedals, amps and a microphone; maybe one lead singer and a bass player with his amp plus a drum kit in the background.
Note: The limit of allowed items differs for guests, signed up users, and the pro version.- Available instruments
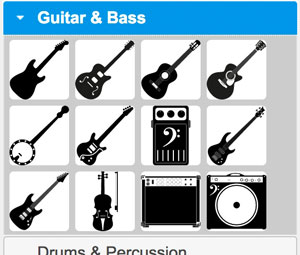 There a various instruments available to choose from. In the Guitar & Bass section you'll also find amps and effect pedals next to the different types of guitars. Drums & Percussion is the second instrument category that contains entire drum kits or single elements. The Keys section contains some different types of keyboards and a piano of course. The next category covers the Vocals which contains several microphones and also some objects for a wireless use. In the next tab you'll find the Brass & Traditional instruments followed by PA & DJ which also contains monitor speakers, mixers and a PA set. The last category is Accessories. There you can find useful things like cables, power plugs, chairs or light systems.
Note: Get more items with the pro version.- Create the Stage Plot
 To arrange objects that have been added to the your Stage Plot you can simply move the instruments around by holding your left mouse button down or on a mobile device tap and hold your finger on it and then move it. In the lower right corner you can see a symbol while hovering over it that lets you resize any object. It is also possible to change the z-order of the objects by moving them. The last object in use will automatically get the highest position.
- Enter object details
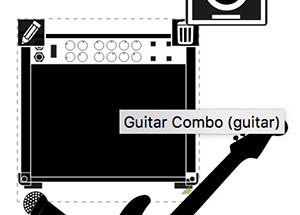
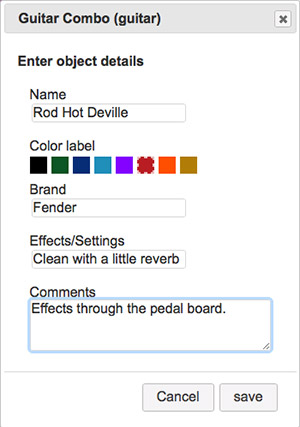 While hovering over an object that has been dropped to your stage you will notice a pencil symbol in the upper left corner. Once you click on it, a window will appear. In this window you can enter five different types of information.
- Name: This could be the exact name of your guitar model for example.
- Color label: You can choose from eight colors to group the objects by artist or type. The default color is black.
- Brand: Here you can choose a brand from an auto completing list, matching to the object category.
- Effects/Settings: Specific settings like echo or EQ that fit to that object will be placed here.
- Comments: Anything else will can be written in the comments field.
- Rotate items on stage plot
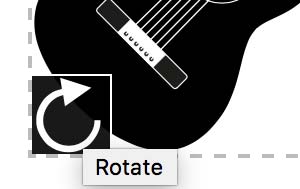 Sometimes it's necessary to rotate an icon to fit on your stage as required. With the button shown on the image on the left you're able to rotate any item. Each click will result in a 45° clockwise rotation which allows you to have 8 different angles for each object.
Note: This feature is only available in the pro version.- Delete objects from Stageplan
 To delete objects you simply need to click on the bin symbol in the upper right corner. Alternatively, you can also find the bin symbol in the list below the stage. If you want to entirely clear the whole stage so that every object will be deleted you can use the button below the stage.
- Download your TecRider as PDF file
 After creating your Tecrider you can download it as a PDF file. The first page will include an image of the stage itself (called Stage Plot) and the name of your Tecrider. The second page is the object list, including all details that you've entered.
Note: This feature requires to sign up, it's free!- Share your Stage Plot
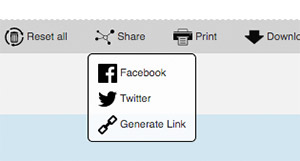 There are several ways to make your Stage Plot become public. Besides printing or downloading it you might consider sharing a generated a Link that displays your Stage Plan with all the entered information. In addition, you can also share your final Stage Setup on Facebook or Twitter. This will automatically show a screenshot of your plan and link it to an own landing page. Please make sure that the entered details contain no private or inappropriate information!
- Print the Stage Plot
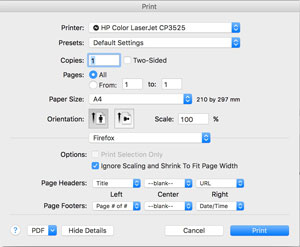 It's also possible to print your Stage Plot over the print button or can just use your browsers printing function through the menu or by pressing Cmd + P (Ctrl + P on Windows) to get to the print dialog. All unnecessary texts and images will not show up on the printout. Note: This feature requires to sign up, it's free!
- List view of the objects and details
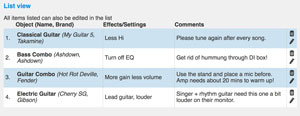 After dropping any object to the stage it will automatically appear in the list below, including any details you have entered. If you have defined a color label, you can find the colored box at the beginning of each line. Once you hover with your mouse over a row the object will be highlighted on the stage. On the right side in the list you can find the bin and pencil symbols again for deleting or editing an object like mentioned above.
- Saving your Technical Rider and Signing up
 After successfully creating your Tecrider online you'll find it very important to use it at a later time to print it or to do some modifications. If you're still not logged in or did not yet register to our free site, that's probably the right moment to do so. Don't worry, your stage setup is stored in a cookie for some time, so it will be still there once you've signed up or logged in. But don't forget to save after that!
Before saving it might be a good idea to give your Stage Plot a reasonable name so you'll find it later within a list of many others. The name will also show on your printout and PDF-file and of course in your Social Media once you've decided to share it.
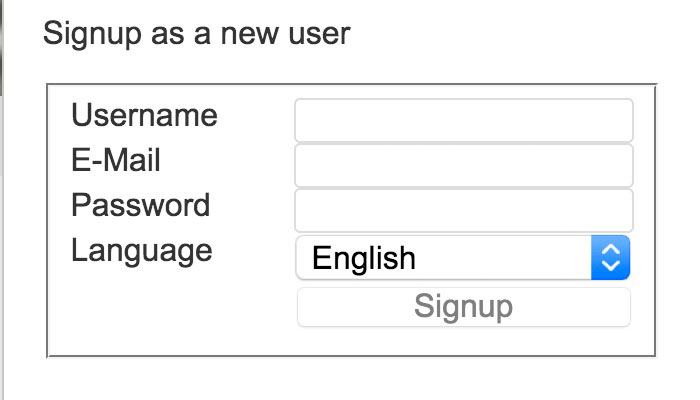
Signing up is totally for free! All you need to enter is your desired username, a password, your email-address and your preferred language.